- Download the free community edition from here
- default id: root
- default password: eve
- Then you will be prompted to change the password to the one that sounds good
- then you will be asked to choose whether you want the machine to be assigned using DHCP or you want to set up a static one
- by clicking on the static option you will be asked to enter each entry manually into a dialog box
- IP address
- netmask
- default gateway
- primary DNS (You can enter google’s dns: 8.8.8.8)
- secondary DNS (can be left empty)
- NTP address (can be left empty) it is for the network time protocol
- I have assigned the ip to my machine in the following way
- under the primary dns and secondary dns you can leave it empty
- You will be using this ip to access the UI of Eve-ng using your browser
- you can also choose to setup with dhcp, here the all the required information will be provided by the dhcp server itself. Though it has a drawback as compared to the static initialization, i.e.,
- the ip address using which you access the UI on the web browser may change after a reboot
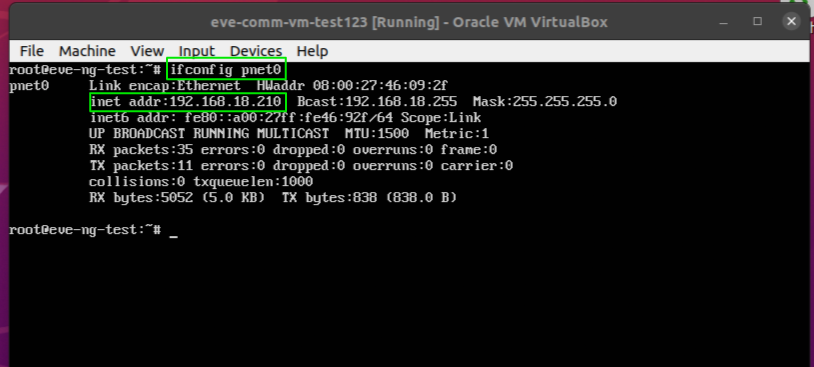
- you can always check that ip address using “ifconfig”
- or you can change dhcp setting wile following the instruction given below:
- start eve-ng from the virtual box
- enter the username and password set by you (username might “root” all lowercase) *Beware of the case sensitivity
- then make changes to the interface file using command “nano /etc/network/interfaces”, after typing initial character you can press tab 2-3 times to see the available options in the CLI
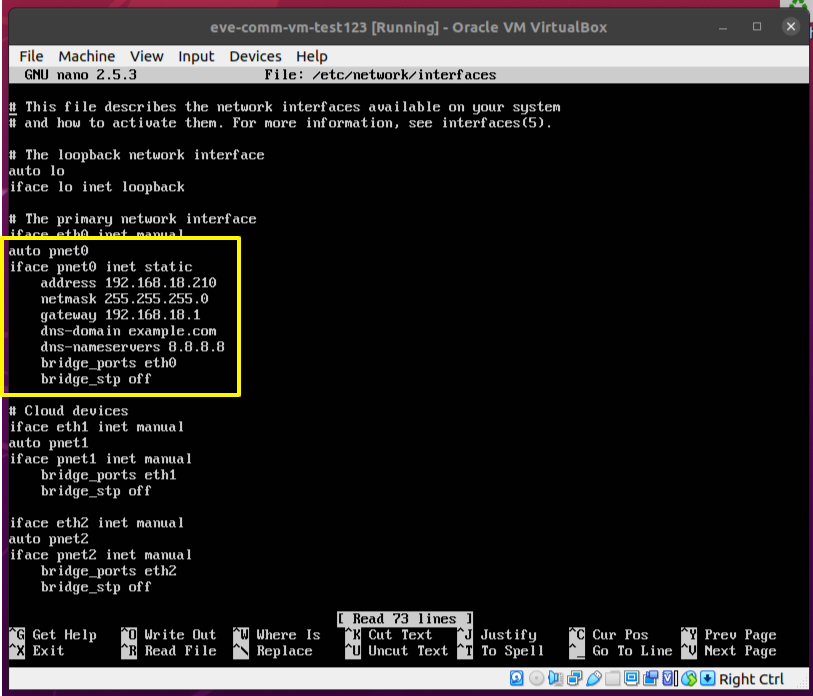
- my LAN is 192.168.18.0/24 so that’s why i am using 192.168.18.* as the ip address (* representing any number between 2 and 254, * = 0 is the network id, * = 1 the default gateway, the router the that hosts the network, * = 255 is the broadcast address.. This is all is a part of ip addressing and all the number included are because of the netmask given to the network your home router so that all the appliances can in the same network can talk to each other)
- After making the above changes in /etc/network/interfaces press Ctrl+O (to save changes) then Enter (to confirm filename) and then Ctrl+X (to exit the editor)
- Once You have made the changes and the machine has got the ip, either statically or through DHCP, it will shown at the starting of the CLI once you reboot it:
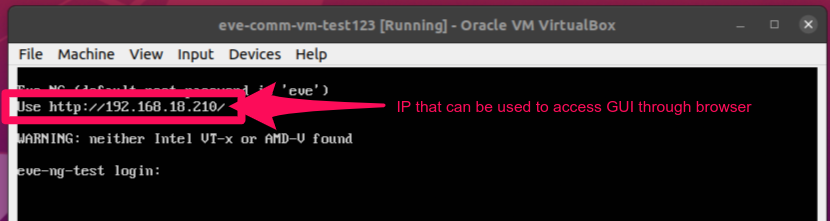
- The ip shown in the pink box above can be used to access the EVE-NG GUI from the browser of your choice
- After entering the given IP in the search bar, you will be prompted to enter the username and password, the default username and password are:
- Username: admin
- Password: eve
2 responses to “Setting up EVE-NG”
Great Explanation. Thank you so much for this.
your welcome:)